Motorcycle Suspension Setup - Day 2
To set up your bike you will require the proper tools as recommended in your bikes handbook, usually a long screw driver, spanner for the front and a funny looking tool for the rear preload and tape measure!!. You will need patience and time. It is best to set the bike up where you are most likely to use it i.e. on the roads or race track.. Ensure your bike is in good working condition, including replacing dodgy fork seals, lubricating linkage, and changing fork or shock oil and you have correct tyre pressure . If you are unsure of your tyre pressure and it is a track bike use 32psi front, 30psi rear.
Twiddling with setting randomly will not get you far. You suspension can be broken down to the following
- Front wheel
Preload
Damping Compression
Damping Rebound - Rear Wheel
Preload
Damping Compression
Damping Rebound
If your bike does not have some of these setting then you will have to compromise on the setting of your bike or buy aftermarket suspension if necessary. You really should set up your bike in the right order. It is best to start with the preloads, front and rear as this is based on your weight and relatively easy to set up, then work your way down.
Rear PreloadWhatever your weight, when you sit on the bike, you want the bike to squat just a little bit (about 30mm) but not too much. You want to ensure that the bulk of your rear suspension travel is available for when you actually ride the bike as opposed to supporting your heavy frame. At the same time you should have a little bit of sag left. If the bike drops too much then increase preload and if you are very light and the bike barely moves under your weight, then soften the preload.
Below is a more detailed explanation. This is easy to set up but can be a bit confusing so just follow the steps one at a time.
 Step 1
  Step 2
 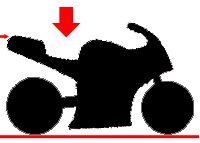 Step 3
Step 1: First find the fully UNLOADED length of your rear suspension. Put your bike on its centre stand. If you do not have a centre stand find a means of lifting the rear wheel up under the engine so that there is no weight (including the weight of the bike) on the rear axle and wheel. Measure the distance between the rear axle and a fixed point directly above like a bolt or mark. Note this measure measurement. Do not use a rear wheel bike stand as there is still the weight of the bike on the swing arm.
Step 2: Find the NORMAL length of you rear suspension. This is amount the suspension drops under the weigh of the bike alone without the rider. Put the bike on level ground and bounce it up and down to free any stickiness. Measure between the same two points as above, i.e. the rear axle and the fixed point directly above.
Step 3: Find the fully LOADED length of your rear suspension. This is the length of the suspension with the rear wheel on level ground and the rider seated on it in his normal riding position in full biking garb. First bounce up and down on the seat to loosen the suspension then get into your normal riding position with all weight on the bike and both feet on the bike. To prevent yourself from falling of (if you have not already) lean the bike against a wall and get your mate to measure between the same two points as above i.e. rear axle and the fixed point directly above.
Next thing is to understand a couple of buzz words. “Static sag” and “Rider sag”.
RIDER SAG is the difference steps 1 and 3. This is the amount the bike drops when your heavy arse sits on the bike.
STATIC SAG is the difference between step 1 and step 2. it is how much the bikes weight acts on the rear suspension or how much you can lift the bike rear without the rider on it before it tops out.
A top racing suspension company suggest that rear wheel rider sag should be around 30-40mm and static sag should be around 5-10mm. However this many vary depending on your bike and manufacturer. The more rider sag you have, the softer the bike suspension will be. I personally use 35mm for road and a few track days use.
Therefore if your rider sag is less than 30 mm then your preload is too hard, if it is more than 40 mm, then it is a bit soft. Once you have set your rider sag as close as possible to 30-40 mm, next check your static sag. If you have more than 10mm then you may need stiffer springs. If however, if your static sag is less than 5mm or you have no static sag then your springs may be too hard for your weight.
If you have to compromise then try to have at least a bit of Static sag in order to stop the bike from topping out.
Note that books, videos, media and pub acquaintances will all have different opinions on the naming and figures quoted above (and below). I find that I get fewer complaints with the current labelling system than I would with other labelling systems.
Avoid being obsessed with numbers and naming systems. I will try to explain the underlying principles of setting up your own bike. There are too many scenarios and permutations surrounding the effects of tweaking each setting that it would take me forever to cover them all. Therefore I will only touch on a few of the more common effects.
Some people set the front suspension based on rider sag and static sag. This is especially useful in determining if you need softer or stiffer springs. Use the same system as above to determine Rider sag (35-48mm) and Static sag (25-30mm). However I prefer the below method to optimise my current original front forks.
You want your bike to use as much front suspension "travel" as possible without "bottoming out" (no more travel) even in extreme conditions. So lets establish how much suspension travel you are currently using.
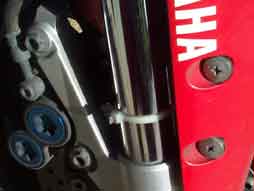 Wrap cable ties around the smooth part (stanchion) of front forks near the rubber seal to the forks. Ensure that it does not scratch the stanchion and it is not too tight as to damage the rubber seals.
With the cable ties in place ride your bike as normal using as many riding conditions (corners, braking, accelerating, wheelies and stopples) that you are likely to meet. Then increase or decrease your preload until the cable tie stops about 10 mm before “bottoming out”.
Reducing preload should give you more travel. If the forks bottoms out, reset the cable ties and increase preload until the cable tie stops around 10mm above the limit. You should always leave about 10mm travel for emergencies like slamming into uncharted potholes.
Done
Sean Onipede - Click here for Motorcycle Suspension Setup Forum
posted by moto-racing at
8:15 AM
![]()

0 Comments:
Post a Comment
Subscribe to Post Comments [Atom]
<< Home